There’s nothing else like real watercolor calligraphy – the rich, watery blends are mesmerizing to watch as they flow together, and a piece can look completely different as the paint dries and settles, giving the finished piece its beautiful depth.
I wanted to try to reproduce watercolor-like effects in Procreate. I tried lots of different ideas that looked… nothing like the real thing. Finally, I found a combination of brush shapes and textures, plus some painting techniques that started to look pretty darn close to real – as soon as I got my first incredulous, “That’s Procreate?” comment on Instagram, I knew I was getting close.
You can use my Watercolor Calligraphy Brush set to achieve these effects, or experiment and try them with any brushes – who knows what kinds of effects you will discover!
Technique 1: Easy Multicolor Watercolor Calligraphy
- Plan your desired color scheme. I made some swatches in my palette before writing my letters
- Draw your letters with a watercolor calligraphy brush. Switch colors for each letter
- Swipe right on the letter layer to lock the opacity (small white corner marks appear on the layer now)
- From the magic wand menu, choose “Gaussian Blur“. Slide your finger across the screen to adjust the amount. Try somewhere in the 50 – 70% range. Your colors now appear to blend between the letters
- Switch to a “wash” brush. Paint the neighboring colors onto each other to enhance the look of the colors mixing together.
- If you add a paper texture to the background, change the blend-mode of the letters to “color burn” to make it look like the paint is soaking into the paper, allowing the texture to come through.
- Try adjusting the colors when you’re done with Magic Wand > hue/Saturation or Magic Wand > color balance. You can get some unexpected color combos this way!
Technique 2: Diluted Watercolor Calligraphy
- Draw your letters with the Diluted Watercolor Brush. Move the opacity slider to a different value for each stroke. High opacity will look like heavy pigment, lowered opacity will look more watery. More variety makes the effect look more interesting.
- Use a soft smudge tool or a soft eraser with a low opacity to clean up any distracting overlap marks.
- Add a new layer. With the new layer active, swipe to the left on the original lettering. Tap “select”. Now the letters are selected but you are painting on a fresh layer.
- Paint with the Wash Brush to deepen some areas of the letter. You can make it look like you “dropped” paint onto some areas while leaving other areas thin.
Mix and Match!
You can combine all of these techniques to get lots of different results. That’s one of the best things about real watercolor – it has so many variables!
Finished Examples:
Here are some pieces made with the techniques above:
-

- Multicolor Digital Watercolor Lettering

-

- Diluted Digital Watercolor technique with two blended colors

-
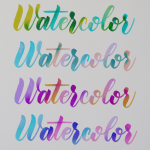
- Experiments with gaussian blur and hue/saturation

How do I get just the color to blur and not the letters themselves? If I go to even 50% gaucassian bluur the word isn’t eligible anymore. Please help!!
You’ve got to turn on the alpha lock for the layer. Swipe the layer to the right in the layers panel to enable.